Markup#
- class augraphy.augmentations.markup.Markup(num_lines_range=(2, 7), markup_length_range=(0.5, 1), markup_thickness_range=(1, 3), markup_type='random', markup_ink='random', markup_color='random', large_word_mode='random', single_word_mode=False, repetitions=1, p=1)[source]#
Bases:
AugmentationUses contours detection to detect text lines and add a smooth text strikethrough, highlight or underline effect.
- Parameters:
num_lines_range (int tuple, optional) – Pair of ints determining the number of added markup effect.
markup_length_range (float tuple, optional) – Pair of floats between 0 to 1 , to determine the length of added markup effect.
markup_thickness_range (int tuple, optional) – Pair of ints, to determine the thickness of added markup effect.
markup_type (string) – Choice of markup “strikethrough”, “highlight”, “underline” or “crossed”.
markup_ink (string, optional) – Types of markup ink, choose from “random”, “pencil”, “pen”, “marker” or “highlighter”.
markup_color (tuple or string) – BGR color tuple.
repetitions (int) – Determine how many time a single markup effect should be drawn.
large_word_mode (boolean) – Set true to draw markup on large words, else large word will be ignored.
single_word_mode (boolean) – Set true to draw markup on a single word only.
p (float, optional) – The probability that this Augmentation will be applied.
- distribute_line(starting_point, ending_point, offset)[source]#
Create smoothed line from the provided starting and ending point.
- Parameters:
starting_point (tuple) – Starting point (x, y) of the line.
ending_point (tuple) – Ending point (x, y) of the line.
offset (int) – Offset value to randomize point position.
- draw_line(p1, p2, markup_mask, markup_thickness, markup_color, reverse)[source]#
Draw line across two provided points.
- Parameters:
p1 (tuple) – Starting point (x, y) of the line.
p2 (tuple) – Ending point (x, y) of the line.
markup_mask (numpy.array (numpy.uint8)) – Mask of markup effect.
markup_thickness (int) – Thickness of the line.
markup_color (tuple) – Color of the line in BGR format.
reverse (int) – Reverse the order of line points distribution.
Overview#
The Markup augmentation uses contours detection to detect text lines and add a smooth text strikethrough, highlight or underline effect.
Initially, a clean image with single line of text is created.
Code example:
# import libraries
import cv2
import numpy as np
from augraphy import *


# create a clean image with single line of text
image = np.full((500, 1500,3), 250, dtype="uint8")
cv2.putText(
    image,
    "Lorem ipsum dolor sit amet, consectetur adipiscing elit",
    (80, 250),
    cv2.FONT_HERSHEY_SIMPLEX,
    1.5,
    0,
    3,
)

cv2.imshow("Input image", image)
Clean image:

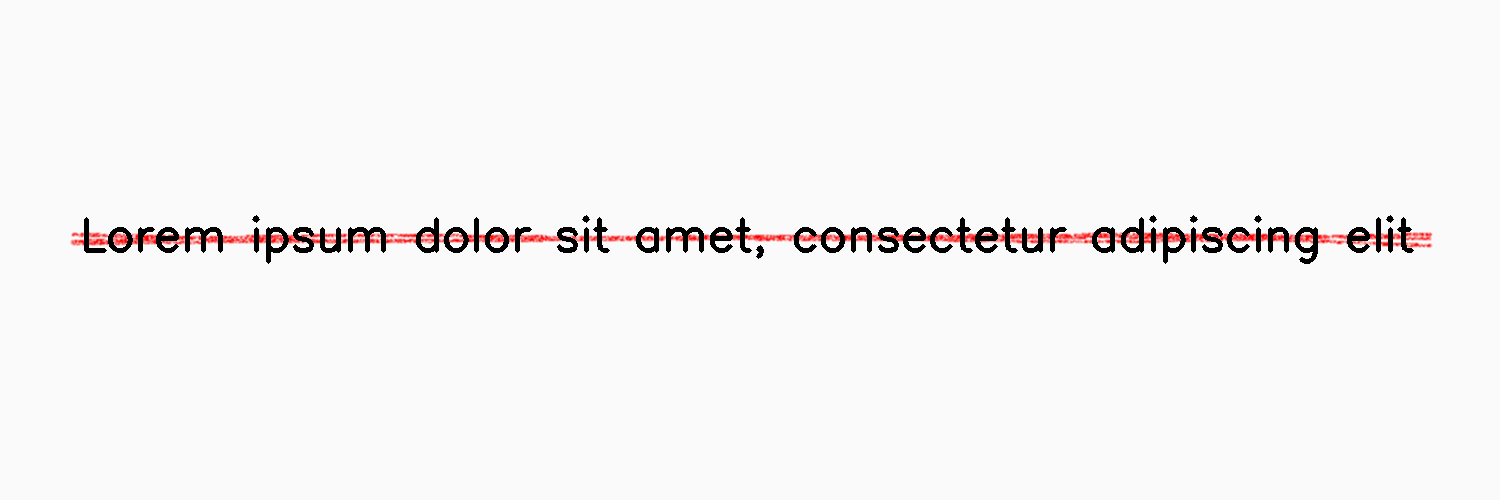
Example 1#
In this example, a Markup augmentation instance is initialized and it is set to apply strikethrough effect (“strikethrough”). The markup ink is set to use “pencil”. Number of strikethrough lines is set to random value in between 5 and 7 (5, 7). The length is set to moderate ratio (0.5, 1) and the thickness is set in range of 1 to 2 pixels (1, 2). The color is set to red in BGR channel (0, 0, 255) and number of lines repetition is set to 4.
Code example:
markup_strikethrough = Markup(num_lines_range=(5, 7),
                              markup_length_range=(0.5, 1),
                              markup_thickness_range=(1, 2),
                              markup_type="strikethrough",
                              markup_ink = "pencil",
                              markup_color=(0, 0, 255),
                              repetitions=4,
                              large_word_mode=1,
                              single_word_mode=False)

img_markup_strikethrough = markup_strikethrough(image)
cv2.imshow("markup_strikethrough", img_markup_strikethrough)
Augmented image:
Example 2#
In this example, a Markup augmentation instance is initialized and it is set to apply highlight effect (“highlight”). The markup ink is set to use a “highlighter”. Number of highlighted lines is set to 1 (1,1). The length is set to moderate ratio (0.5, 1) and the thickness is set to 5 pixels (5, 5). The color is set to green in BGR channel (0, 255, 0) and number of hightlight repetition is set to 1.
Code example:
markup_highlight = Markup(num_lines_range=(1, 1),
                          markup_length_range=(0.5, 1),
                          markup_thickness_range=(5, 5),
                          markup_type="highlight",
                          markup_ink="highlighter",
                          markup_color=(0, 255, 0),
                          repetitions=1,
                          large_word_mode=1,
                          single_word_mode=False)

img_markup_highlight = markup_highlight(image)
cv2.imshow("markup_highlight", img_markup_highlight)
Augmented image:

Example 3#
In this example, a Markup augmentation instance is initialized and it is set to apply underline effect (“underline”). The markup ink is set to use “marker”. Number of underline lines is set to 1 (1,1). The length is set to moderate ratio (0.5, 1) and the thickness is set to 2 pixels (2, 2). The color is set to blue in BGR channel (255, 0, 0) and number of hightlight repetition is set to 1.
Code example:
markup_underline = Markup(num_lines_range=(1, 1),
                          markup_length_range=(0.5, 1),
                          markup_thickness_range=(2, 2),
                          markup_type="underline",
                          markup_ink="marker",
                          markup_color=(255, 0, 0),
                          repetitions=1,
                          large_word_mode=1,
                          single_word_mode=False)

img_markup_underline = markup_underline(image)
cv2.imshow("markup_underline", img_markup_underline)
Augmented image: